
Whitfield Pellet Stove Operating Instructions: A Comprehensive Guide
This guide details safe setup and operation of Whitfield & Traditions pellet stoves, including P11, Profile 20, and Profile 30 series.
Downloadable manuals are available, alongside replacement parts at WoodHeatStoves.com.
Whitfield pellet stoves represent a commitment to efficient, reliable, and environmentally conscious home heating. For decades, Whitfield has been a trusted name in the wood heating industry, renowned for innovative designs and robust construction. These stoves offer a convenient alternative to traditional wood stoves, utilizing compressed wood pellets as fuel – a renewable resource offering high heat output with minimal ash production.
This comprehensive guide is designed to equip you with all the necessary information to safely and effectively operate your Whitfield pellet stove. Whether you own a freestanding model or an insert, such as the popular P11, Profile 20, or Profile 30 series, this resource will cover everything from initial setup and lighting procedures to routine maintenance and troubleshooting.
Understanding your stove’s features and operating principles is crucial for maximizing its performance and ensuring years of dependable service. Remember, manuals aren’t mailed; they are available as PDF downloads within 24 hours of purchase from infowoodheatstoves.com. Should you require assistance, don’t hesitate to contact their support team with your stove’s make, model, and serial number.
Safety Information & Precautions
Prior to operating your Whitfield pellet stove, a thorough understanding of safety precautions is paramount. Improper installation or operation can lead to fire, carbon monoxide poisoning, or other hazardous situations. Always read the entire installation and operation manual before beginning. Ensure the stove is installed by a qualified technician, adhering to all local and national codes.
Never operate the stove with the glass front removed or broken. Keep combustible materials a safe distance from the stove, as specified in the manual. Regularly inspect the exhaust vent system for obstructions or damage, and ensure proper airflow. Do not use flammable liquids to start or revive the fire.
Carbon monoxide detectors are essential in homes with pellet stoves. Test them regularly. Keep children and pets supervised around the stove, as surfaces can become hot. Familiarize yourself with error codes and troubleshooting procedures. In case of a malfunction, immediately shut down the stove and contact Whitfield support at infowoodheatstoves;com, providing the model and serial number.
Understanding Pellet Fuel
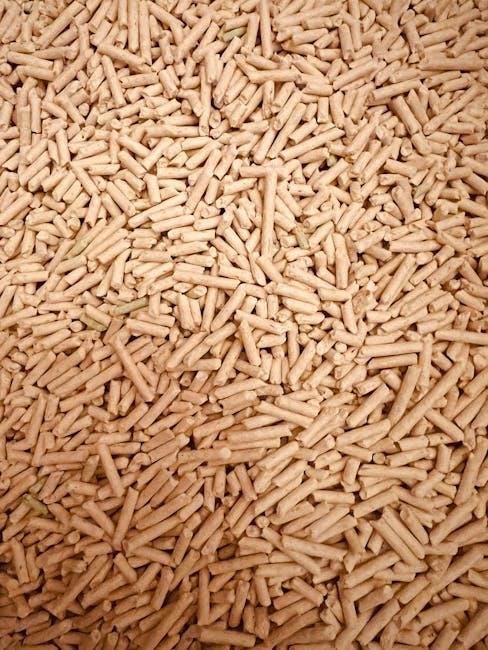
Whitfield pellet stoves are designed to burn wood pellets, a renewable and efficient heating source. Pellets are manufactured from compressed sawdust and wood waste, offering consistent size and low moisture content for optimal combustion. The quality of pellet fuel significantly impacts stove performance and efficiency.
Premium grade pellets generally produce more heat and less ash. Avoid using pellets that are damaged, dusty, or contain excessive fines (small particles). Store pellets in a dry, well-ventilated area to prevent moisture absorption, which can lead to clumping and feeding issues. Different wood types create pellets with varying heating values; hardwoods typically offer higher BTU output.
Regularly check your pellet supply for quality. Avoid mixing old and new pellets. Ensure the auger and feed system are free from obstructions to maintain a consistent fuel flow. Using the correct pellet fuel type, as recommended by Whitfield, will maximize stove performance and longevity, ensuring a warm and efficient heating experience.
Pre-Lighting Instructions
Before initiating the lighting sequence, several crucial preparatory steps must be completed to ensure safe and efficient operation of your Whitfield pellet stove. First, verify the ash pot is empty or contains minimal ash accumulation. A full ash pot restricts airflow and hinders proper combustion.

Next, confirm the pellet storage bin is adequately filled with high-quality, dry pellet fuel. Insufficient fuel will interrupt operation. Inspect the glass door for cleanliness; a clear view allows monitoring of the flame pattern. Ensure the exhaust vent is unobstructed and free from debris, crucial for proper venting of combustion gases.
Finally, double-check that all safety precautions, as detailed in the Safety Information section, have been followed. Familiarize yourself with the stove’s operation and the location of emergency shut-off procedures. Following these pre-lighting instructions will contribute to a successful and safe start-up of your Whitfield pellet stove.
Lighting the Stove – With FASTFIRE Self-Igniter
Whitfield stoves equipped with the FASTFIRE self-igniter offer a convenient and reliable lighting process. Begin by ensuring the power switch is in the ‘ON’ position; On the control panel, select the ‘Light’ or ‘Start’ function – the exact terminology may vary slightly depending on your model. The FASTFIRE igniter will automatically begin heating, initiating the combustion process.
Observe the burn pot through the glass door. Within a few minutes, you should see pellets igniting and a flame establishing. The auger will begin feeding pellets into the burn pot, gradually increasing the flame size. Allow the stove to cycle through its initial burn-in phase, as described in the dedicated section.
Avoid manually adjusting settings during this initial phase. The stove’s control system will automatically manage airflow and fuel feed. If the stove fails to ignite after several attempts, consult the Troubleshooting section or contact Whitfield support for assistance.
Lighting the Stove – Without FASTFIRE Self-Igniter

For Whitfield stoves lacking the FASTFIRE system, a manual lighting procedure is required. First, open the stove door and carefully pour approximately 2-3 pounds of pellet fuel into the burn pot, forming a small pyramid. Ensure the fuel is evenly distributed for optimal ignition.
Next, using a long-handled lighter or fireplace match, ignite the pellets in several locations around the base of the pyramid. Close the stove door, leaving it slightly ajar initially to provide sufficient airflow for combustion. Monitor the burn pot through the glass.
Once the pellets are burning steadily, gradually close the door completely. Select the ‘Light’ or ‘Start’ function on the control panel. The auger will begin feeding pellets, and the stove will transition to automatic operation. Allow the stove to complete its initial burn-in cycle, as detailed in the corresponding section. If ignition fails, repeat the process or consult the troubleshooting guide.
Initial Burn-In Procedure
Following the initial lighting, a crucial burn-in period is necessary for optimal performance and longevity of your Whitfield pellet stove. During the first three full burn cycles, operate the stove at its highest heat setting. This process helps to cure the internal components and establish proper airflow patterns.
Expect some minor smoke and odors during this phase, as residual manufacturing oils and coatings are burned off. Ensure adequate ventilation in the room during the burn-in process. Avoid frequent adjustments to the stove settings during these initial cycles; allow it to run continuously at maximum output.
After the first three cycles, gradually reduce the heat setting to your desired comfort level. Monitor the stove’s performance closely, observing the flame pattern and exhaust temperature. This burn-in procedure is vital for ensuring efficient and clean operation throughout the stove’s lifespan. Refer to your owner’s manual for specific recommendations related to your model.
Stove Operation Modes
Whitfield pellet stoves typically offer several operation modes to suit your heating needs and preferences. These commonly include “High,” “Medium,” and “Low” settings, allowing for adjustable heat output and burn rates. Some models feature an “Auto” mode, which automatically adjusts the heat based on room temperature, maintaining a consistent and comfortable environment.
A “Cool Down” or “Standby” mode is also frequently available, reducing the stove’s activity after a burn cycle to minimize pellet consumption and maintain a low ember bed. Understanding these modes is key to efficient operation. The control panel provides easy access to select the desired mode.
Experiment with different settings to find the optimal balance between heat output and fuel efficiency for your home. Always consult your owner’s manual for a detailed explanation of the specific operation modes available on your Whitfield stove model. Proper mode selection ensures both comfort and cost-effectiveness.
Adjusting Heat Output
Controlling the heat from your Whitfield pellet stove is primarily achieved through the control panel. Most models allow adjustment via settings like “High,” “Medium,” and “Low,” directly influencing the auger feed rate and blower fan speed. Increasing the feed rate delivers more pellets to the burn pot, resulting in higher heat output.
Conversely, reducing the feed rate lowers the heat. The blower fan speed also plays a crucial role; a faster fan distributes heat more quickly, while a slower fan provides a gentler warmth. Fine-tuning these settings allows you to precisely match the heat output to your comfort level and the room’s heating requirements.
Remember that external factors like insulation and outdoor temperature will affect how quickly a room heats up. Experimentation is key to finding the ideal settings for your specific home. Refer to your owner’s manual for detailed instructions specific to your Whitfield stove model.
Understanding the Control Panel
The Whitfield pellet stove control panel is your central hub for operation. It typically features a digital display showing current settings, temperature readings, and any error codes. Key buttons usually include “Power,” “Auger Control,” “Fan Speed,” and “Temperature Set.” The “Auger Control” manages pellet feed, influencing heat output. “Fan Speed” adjusts airflow for heat distribution.
“Temperature Set” allows you to establish a desired room temperature, with the stove automatically modulating to maintain it. Some models offer programmable schedules for automated operation. Understanding the icons and menu options is crucial; consult your owner’s manual for a detailed explanation of each function.
Modern Whitfield stoves may also include features like remote control compatibility or Wi-Fi connectivity for smartphone control. Familiarize yourself with all panel functions to optimize performance and ensure safe, efficient heating. Regularly check the display for error messages and refer to the troubleshooting section of your manual.
Auger and Feed System Operation
The Whitfield pellet stove’s auger is a rotating screw mechanism responsible for delivering fuel from the storage hopper to the burn pot. Controlled by the control panel, the auger’s speed dictates the pellet feed rate, directly impacting heat output. A properly functioning auger is vital for consistent and efficient combustion.

During startup, the auger initially primes the feed system, filling the burn pot with pellets. Once lit, it maintains a steady fuel supply. The feed rate is adjusted automatically based on the set temperature or manually via the control panel. Listen for consistent auger operation; unusual noises could indicate a blockage or malfunction.
Regular cleaning of the auger and feed system is essential to prevent clogs from dust or debris. Refer to the maintenance section of your owner’s manual for specific cleaning instructions. Avoid introducing foreign objects into the hopper, as these can damage the auger and disrupt fuel delivery.
Airflow Control and Adjustment
Optimal combustion in your Whitfield pellet stove relies heavily on precise airflow control. The stove utilizes a combination of primary and secondary air systems to ensure efficient burning and minimize emissions. Primary air, introduced beneath the burn pot, supports initial ignition and fuel gasification. Secondary air, supplied above the burn pot, promotes complete combustion of volatile gases.
Airflow is typically managed automatically by the stove’s control system, adjusting based on the selected heat output and burn rate. However, some models may offer manual airflow adjustments. Proper airflow is crucial for a clean burn; insufficient air leads to smoldering and increased creosote buildup, while excessive air reduces efficiency.
Regularly inspect the air intake vents for obstructions like dust or ash. Ensure the exhaust vent is clear and unobstructed to maintain proper draft. Refer to your owner’s manual for specific instructions on airflow adjustment and troubleshooting related to combustion quality.
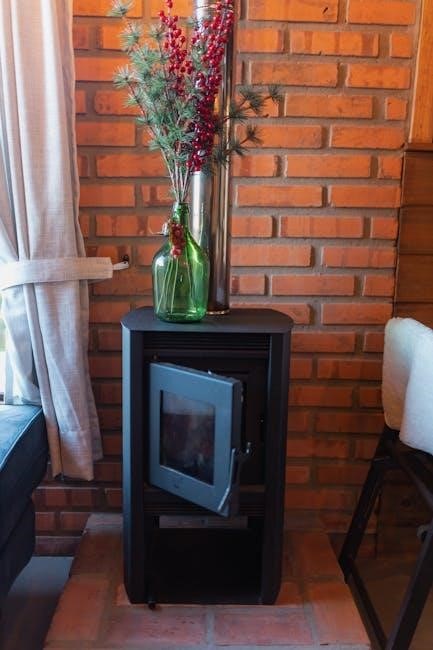
Routine Cleaning & Maintenance
Consistent maintenance is vital for safe and efficient operation of your Whitfield pellet stove. Daily, remove ash from the burn pot, ensuring it doesn’t obstruct the airflow. Weekly, inspect and clean the firebox, removing any accumulated ash or debris. Pay close attention to the glass door, cleaning it regularly with a specialized pellet stove glass cleaner to maintain visibility;
Monthly, thoroughly inspect the venting system for creosote buildup. While pellet stoves produce less creosote than wood stoves, regular checks are crucial. Annually, a professional inspection and cleaning of the entire stove and venting system are highly recommended. This includes the auger, feed system, and combustion chamber.

Always disconnect power before performing any maintenance. Refer to your owner’s manual for detailed cleaning procedures and recommended maintenance schedules. Proper upkeep extends the life of your stove and ensures optimal performance.
Ash Removal Procedures
Regular ash removal is essential for maintaining optimal performance and preventing potential issues with your Whitfield pellet stove. Allow the stove to cool completely before beginning the process – never remove ash while the unit is operating or still warm. Use a dedicated ash vacuum or a metal container with a tight-fitting lid for safe ash disposal.
Carefully remove ash from the burn pot and firebox, avoiding creating dust clouds. A small amount of ash can be left to aid in ignition, but excessive buildup restricts airflow. Inspect the area beneath the burn pot for any accumulated pellets or debris. Ensure all ash is completely extinguished before disposal, as embers can remain hidden for extended periods.
Dispose of ash responsibly, away from combustible materials. Never place ash in plastic containers or near flammable substances. Consult local regulations regarding ash disposal. Proper ash removal contributes to a cleaner, more efficient, and safer heating experience.
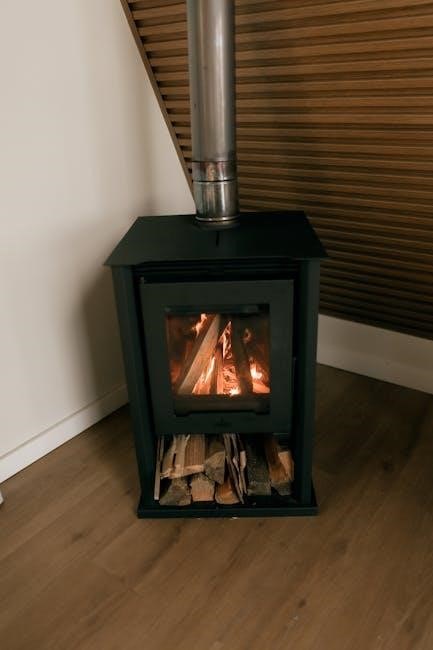
Glass Cleaning & Maintenance
Maintaining a clean glass front is crucial for optimal viewing of the flames and ensuring efficient heat transfer. Regular cleaning prevents soot buildup, which can reduce visibility and potentially affect stove performance. Always allow the stove to cool completely before attempting to clean the glass.
Use a specialized pellet stove glass cleaner – avoid abrasive cleaners or harsh chemicals, as these can damage the glass surface. Apply the cleaner to a soft cloth and gently wipe the glass, removing soot and residue. For stubborn deposits, a plastic scraper can be used cautiously. Avoid excessive pressure to prevent scratches.
Regular cleaning, ideally after each burn cycle or every few days, will minimize buildup and make the process easier. Inspect the glass gasket for damage or deterioration; a compromised gasket can allow smoke to escape. Replace the gasket if necessary to maintain a tight seal and efficient operation. A clean glass front enhances both the aesthetic appeal and functional performance of your Whitfield stove.
Troubleshooting Common Issues
Encountering operational hiccups with your Whitfield pellet stove is normal. Common issues include inconsistent heat output, difficulty igniting, or error code displays. First, verify adequate pellet fuel supply and ensure the auger is functioning correctly. Check for obstructions in the feed system that might hinder pellet delivery.
If the stove fails to ignite, confirm the FASTFIRE igniter is working (if equipped) and the electrical connection is secure. Inspect the exhaust vent for blockages, as restricted airflow can cause ignition problems. Error codes provide valuable diagnostic information; consult the “Error Codes and Their Meanings” section of this guide for specific troubleshooting steps.
For persistent issues, check the fuse and replace if blown. If problems continue, consult your owner’s manual or contact Whitfield Support at infowoodheatstoves.com, providing the stove’s make, model, and serial number for efficient assistance. Remember safety first – never attempt repairs while the stove is operating.
Error Codes and Their Meanings
Whitfield pellet stoves utilize error codes to signal malfunctions, aiding in quick diagnosis. A “Low Fuel” code indicates insufficient pellets in the hopper – replenish immediately. “Overheat” signifies excessively high temperatures; allow the stove to cool and check for airflow obstructions. “Auger Jam” suggests a blockage in the auger or feed system, requiring inspection and removal of any obstructions.
“No Flame” indicates the igniter isn’t detecting a flame during startup, potentially due to fuel quality or igniter failure. “Draft Issue” signals problems with the exhaust vent, possibly a blockage or improper installation. “Sensor Failure” points to a malfunctioning temperature sensor, necessitating replacement.
Consult your owner’s manual for a comprehensive list of all error codes and their corresponding solutions. Note the specific code displayed, and before attempting repairs, disconnect power to the stove. If you’re unable to resolve the issue, contact Whitfield Support at infowoodheatstoves.com, providing the error code, stove model, and serial number.
Replacing the Fuse
Before replacing the fuse on your Whitfield pellet stove, always disconnect the power supply at the circuit breaker to prevent electrical shock. Locate the fuse holder, typically found near the control panel or power entry point – consult your owner’s manual for the precise location. Gently remove the fuse holder and inspect the fuse for a broken filament.
To replace, use only a fuse with the exact same amperage and voltage rating as the original. Using an incorrect fuse can cause serious damage to the stove or create a fire hazard. Insert the new fuse firmly into the holder and reinsert the holder into its slot.
Restore power at the circuit breaker and test the stove. If the fuse blows again immediately, do not continue to replace fuses; a more significant electrical issue exists. Contact Whitfield Support at infowoodheatstoves.com, providing the stove model and serial number for assistance.
Checking and Cleaning the Exhaust Vent
Regular inspection of your Whitfield pellet stove’s exhaust vent is crucial for safe and efficient operation. At least annually, and more frequently with heavy use, examine the vent pipe for obstructions like creosote buildup, bird nests, or debris. A blocked vent can cause dangerous carbon monoxide buildup.
To clean, disconnect the stove from power. Carefully disassemble the vent pipe sections, wearing gloves and a dust mask. Remove any accumulated creosote or obstructions using a vent cleaning brush specifically designed for pellet stoves. Ensure all connections are secure and airtight after reassembly.
Professional inspection is recommended, especially for complex venting systems. Refer to your owner’s manual for specific venting requirements and safety guidelines. Ignoring vent maintenance can void your warranty and pose a serious safety risk. Contact a qualified technician if you are uncomfortable performing this task.
Pellet Storage Guidelines
Proper pellet storage is essential to maintain fuel quality and ensure optimal stove performance. Store pellets in a dry, well-ventilated area, protected from rain, snow, and direct sunlight. Moisture absorption degrades pellet quality, leading to reduced heat output and increased ash production.
Ideal storage locations include a shed, garage, or dedicated indoor space with a waterproof floor. Avoid storing pellets directly on concrete floors, as they can absorb moisture. Keep pellets off the ground using pallets or a raised platform. Ensure adequate airflow around the pellet bags to prevent condensation.
First-in, first-out inventory management is recommended. Use older pellets before newer ones to prevent degradation over time. Inspect bags regularly for damage and discard any compromised pellets. Following these guidelines will help you maximize the efficiency and lifespan of your Whitfield pellet stove.
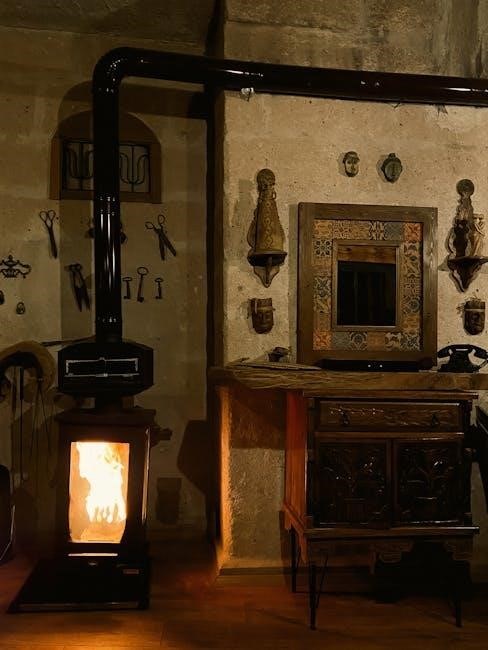
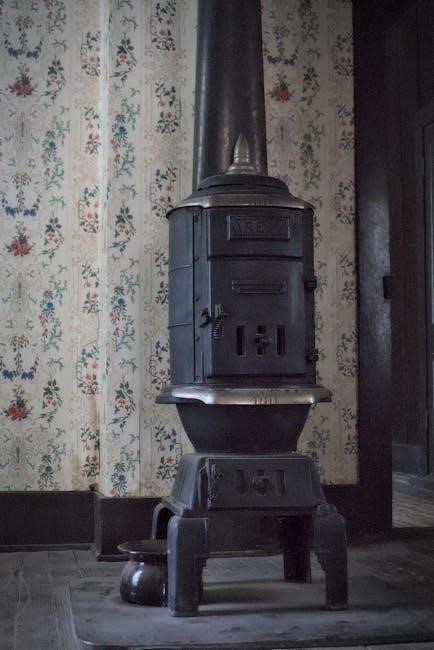
Whitfield Stove Model Variations (P11, Profile 20, Profile 30)
Whitfield offers a range of pellet stove models designed to suit various heating needs and home aesthetics. The P11 is a compact, efficient option ideal for smaller spaces, known for its straightforward operation and reliable performance. It’s a great entry point into pellet heating.
The Profile 20 represents a step up in heating capacity and features a larger firebox for longer burn times. Its refined design blends seamlessly into many home decors. Profile 30, the largest in the series, delivers substantial heat output, suitable for larger homes or colder climates.
While core operating principles remain consistent across all models – utilizing auger feed, airflow control, and digital controls – specific features and BTU outputs vary. Always refer to the owner’s manual specific to your model (P11, Profile 20, or Profile 30) for detailed instructions and specifications. Downloadable manuals are available at WoodHeatStoves.com.
Downloading Owner’s Manuals & Guides
Accessing your Whitfield pellet stove’s owner’s manual is crucial for safe and efficient operation. Manuals are provided as PDF downloads, not mailed physically. Upon purchase, you should receive a download link within 24 hours. This link grants access to comprehensive installation and operating instructions tailored to your specific model.
If you haven’t received the link, or require a replacement copy, don’t hesitate to contact Whitfield Support at infowoodheatstoves.com. Be sure to include your stove’s make, model, and serial number in your inquiry to ensure a prompt and accurate response.
WoodHeatStoves.com also hosts a library of Whitfield pellet stove manuals, offering convenient access to guides for installation, operation, and maintenance. Downloading and reviewing the manual before operating your stove is highly recommended. Over 26 Whitfield PDF user manuals are available for download, covering various models and service needs.
Finding Replacement Parts
Maintaining your Whitfield pellet stove requires occasional replacement of parts due to normal wear and tear. WoodHeatStoves.com is a comprehensive resource for sourcing genuine Whitfield replacement parts, ensuring optimal performance and longevity of your heating system.
They carry parts for a wide range of manufacturers, including Whitfield, Quadrafire, Enviro, and more, offering a diverse selection to meet your specific needs. Their pellet stove parts section provides easy navigation to find components compatible with your model.
When ordering parts, having your stove’s model and serial number readily available is essential for accurate identification and compatibility. Refer to your owner’s or technical manual for guidance on locating this information. WoodHeatStoves.com emphasizes the importance of consulting your manual before attempting any repairs or replacements. Proper installation is key to safe and efficient operation.
Contacting Whitfield Support (infowoodheatstoves.com)
For any questions regarding your Whitfield pellet stove, or if you require assistance with installation, operation, or troubleshooting, infowoodheatstoves.com is your primary point of contact. They are dedicated to providing excellent customer support and ensuring your satisfaction with your heating appliance.
If you are unable to locate the specific owner’s manual for your stove model, do not hesitate to reach out to their support team. Be prepared to provide the make, model, and, crucially, the serial number of your stove. This information allows them to quickly identify your unit and offer tailored assistance.
Manuals are provided as PDF downloads, not mailed physically, and are typically available within 24 hours of purchase. infowoodheatstoves.com is committed to resolving any issues you may encounter and helping you maximize the benefits of your Whitfield pellet stove. Their expertise is readily available to guide you.
Serial Number Location & Importance
Your Whitfield pellet stove’s serial number is a crucial piece of information for identifying your specific model and accessing relevant support resources. It’s essential when contacting infowoodheatstoves.com for assistance with manuals, parts, or troubleshooting. Without it, accurate support becomes significantly more difficult to provide.
The exact location of the serial number may vary slightly depending on the specific Whitfield stove model (P11, Profile 20, Profile 30, etc.). However, it is typically found on a label affixed to the stove’s chassis, often within the firebox or on the rear of the unit. Consult your owner’s manual for precise details regarding its location for your particular stove.
Keep this number readily accessible, as you’ll need it when downloading manuals, ordering replacement parts, or seeking technical support. Having the serial number ensures you receive the correct information and components tailored to your stove’s specifications, guaranteeing optimal performance and safety.
No Responses